Some day when I grow up, I want to raise my own pork here on Sparrow’s Nest Farm. For now, though, we’re still learning the ropes with our chickens, rabbits, sheep and goats, so the pigs will have to wait another year or so. I’m fortunate enough, however, to have farmer friends, and the folks at Easter Egg Acres in Ellicott were kind enough to raise a couple for us this year. We picked them up last week, and I can honestly say the meat is delicious, and much healthier than factory-raised pork.
When the pig was processed, we had the option of keeping or disposing of the fat. I’d heard people talk about making their own lard out of the fat, so I figured I’d give it a try. It didn’t sound terribly hard, and it actually wasn’t. I will say, though, that rendering lard will never go to the top of my “Favorite Things To Do” list because it’s time-consuming, and I’m not known for my patience.
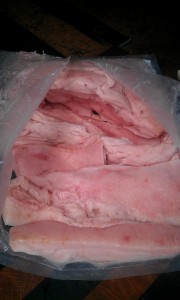
The fat from each pig was separated into two bags. The smaller bag, weighing about 5.5 pounds, consisted of what my father in law calls “Leaf Lard”. At 93 years old, he’s seen a lot of pork fat in his day, and the leaf lard is the purest fat that comes from around the kidney and stomach area of the pig. It’s cleaner and less “piggy” than the back fat, more commonly known as “fatback”. As you can see, the fat was clean and cut into long strips, which made it easy to process.
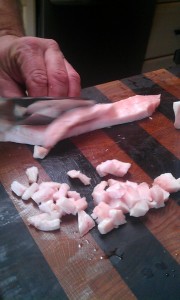
I started by cutting the fat into half-inch chunks so it would melt faster (actually my husband did it so I could take his picture). With a good sharp knife, this took very little time. He started by cutting each strip into narrower strips, then dicing it into smaller pieces.
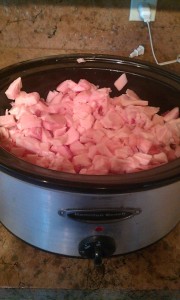
After he finished, I put the chunks into my crock pot, turned it on low, and prepared to wait. And wait. And wait. Finally I turned it up to high and kept waiting. Next time I’m going to try putting it all into a large pot on the stove and setting the heat on low to see if melts faster. Some folks also put it in the oven on low heat and leave it all day. I may try that as well and see which method I like best. The trick is to keep the heat low enough that the cracklings don’t start to fry and darken the lard.
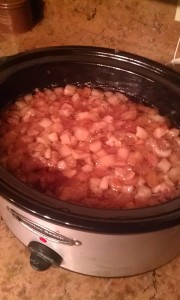
Several hours later, the fat was starting to melt down nicely. You can see from this picture that a large portion of it has melted already, but it’s still not at the stage where just the cracklings are left.
I’m guessing it took a good 10 to 12 hours for all the fat to finally melt down where I could strain it. Once it was ready, I took a small strainer, lined it with an old piece of cheesecloth, then strained it into a clean bowl.
I then poured the strained liquid into quart jars and let them sit on the counter overnight to cool. The liquid fat had a yellowish/golden color to it.
Once it cooled overnight, though, the end result was pure white leaf lard that will be excellent for making biscuits, pie crusts, and other baked goods. Assuming, of course, that I ever decide to bake. Anyway, you can see how beautifully this first batch of lard turned out.
When all was said and done, I had processed approximately 11 pounds (two bags) of fat and ended up with a little over a gallon of lard for my efforts. It took a full two days, but it wasn’t difficult (although the house did smell a little “piggy” during the melting process). I had a bunch of cracklings left over after the fat was processed, and many people told me how good these are fried hard and salted. I tried it, but I have to say I wasn’t a fan. They were far too greasy for my taste, and they had any “airy” texture that didn’t appeal to me at all. My chickens, however, loved them!
A few final thoughts before I go….You may be wondering why on earth anyone would want to cook with lard. It’s probably a matter of taste, but I can tell you that lard is much healthier than any store-bought shortening. It has no hydrogenated fats, or trans-fats or anything of those other processed fats that negatively impact our cholesterol, and for me, this is a big deal.
I still have approximately 30 pounds or more of fatback to render when I have the time and nothing else more interesting to do. For now it’s in the freezer, where it will last a good long time. From what I hear, the lard rendered from the fatback will not be quite as white, but it’s perfect for cooking and frying chicken. With the fat from two pigs, we’ll have more than enough lard to last us all year…possibly longer, so I’m canning it as I go and storing it downstairs in my root cellar. It’s easy enough to do. Just put the quart jars into a water bath canner and process for 15 minutes (30 minutes at high altitude). Voila’, now it will last indefinitely!


November 21, 2012 at 9:33 pm
Hi Denise! We render alot of lard here at Rolling Bay Farm for cooking and making soap. You are right that it is time consuming and makes for a piggy smelling house. We try to do really big batches in a commercial sized pot outside on a burner ring. That way it can bubble away all day and you can just stop by and periodically dump in some water. Give it a try since you have so much left.
LikeLike
November 22, 2012 at 1:47 am
What a great idea! I do have a big stainless steel pot I could put on the gas burner attached to our grill. Brilliant! Thank you!
LikeLike
November 22, 2012 at 2:25 am
Learn how to make soap, maybe lard and oatmeal? Then I will steel it next summer when I come over 😉
LikeLike
November 22, 2012 at 3:07 am
That’s on my to-do list! I’m still trying to master cheddar cheese right now, though. I’m a slow learner! Hopefully before you get here I”ll have made at least one batch!
LikeLike